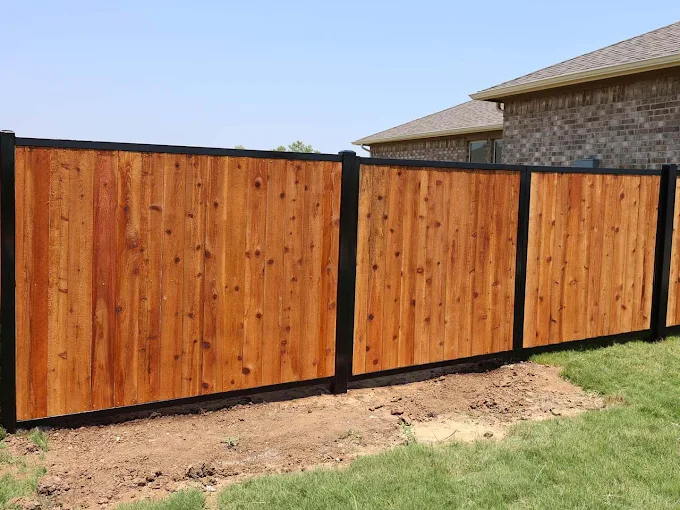
Fence Staining Secrets for Rich, Long-Lasting Color
A neighbor’s privacy fence can look amazing for a season—then you start seeing dull patches, lighter streaks near the bottoms, and that “grayish” fade that makes the whole yard feel tired. In Plano and across North Texas, that happens fast when a wood fence is stained without the right prep, the wrong timing, or the kind of coating system that can’t handle our heat and wet-dry swings.
We see it often when homeowners decide to refresh their curb appeal—usually after the wood has already dried out unevenly or started to cup from moisture movement. The good news: rich, even color is achievable, and it’s mostly about doing the boring-but-critical steps correctly.
Whether you have a traditional residential fencing solutions setup or you’re maintaining a larger perimeter, staining performance comes down to what’s happening underneath the color coat.
Quick Answer
For long-lasting, rich fence color in North Texas, you need:
- Proper cleaning and surface prep (remove mildew, dirt, and loose fibers)
- Correct moisture timing (stain when the wood is dry enough to accept coating)
- A stain system matched to your wood condition (penetrating stain vs. film-forming products)
- Good application habits (consistent thickness, back-brushing, and even coverage)
- Post-care planning for sun, sprinklers, and rainfall patterns
If those steps are rushed, even the best stain won’t hold its color.
The Staining Process That Actually Produces “New Fence” Color
Here’s the contractor approach we use when we want the finish to look deep and stay that way—not just for a few months.
1) Start with the right inspection (not just a quick power wash)
One of the first things we check is whether the fence is truly ready for staining. In Texas, wood can look “clean” but still be contaminated with surface residue or mildew that won’t be visible until the stain hits.
On a recent Plano-area job (an older backyard fence replacing panels over time), the homeowner thought they could stain right away because the boards looked fine. After we cleaned and tested, we found uneven absorption—some areas drank stain while others resisted it. That’s a sign the wood surface wasn’t uniformly conditioned, which leads to blotchiness and early fading.
2) Clean thoroughly, but avoid damaging the wood
A common misconception is that more pressure equals better results. Too much aggressive cleaning can open up fibers in a way that changes how stain absorbs, creating patchy color.
Instead, we focus on:
- Removing mildew and dirt with the right cleaner
- Loosening and brushing off residue so the stain can penetrate
- Letting the fence dry completely before coating
3) Choose a stain system based on the wood’s current state
Not all stains behave the same. The “rich color” you want depends on whether the product is designed to penetrate and whether it’s compatible with what’s already on the wood.
In our experience, the biggest early failures come from mismatched systems—like applying a stain meant for bare, clean wood over surfaces that still have old buildup or inconsistent moisture content.
A simple way to think about it:
- Bare, weathered wood: penetrating stain often gives the most natural, long-lasting look
- Previously coated or unevenly sealed wood: you may need more careful prep and product matching
- Heavily sun-faded boards: expect to do more conditioning so the color can “take” evenly
4) Apply with the right technique (this is where color depth is won)
Even the best product can turn dull if it’s applied unevenly.
We aim for:
- Consistent wet coverage across all boards
- Back-brushing (especially on textured grain) to encourage even penetration
- Avoiding runs and puddling, which can skin over and fade differently
- Staining in manageable sections so the finish doesn’t overlap while drying
5) Timing matters more in North Texas than many homeowners realize
Plan your staining around weather windows. In North Texas, you can get a “dry-looking” fence that still holds moisture in the wood. Then a warm evening turns into overnight humidity, and the coating struggles to bond correctly.
A practical rule of thumb we follow: stain only when you can reasonably keep the fence protected from heavy rain and sprinkler spray for the next day or two—long enough for proper set-up.
What Property Owners Often Overlook
“The fence looks dry, so it’s ready.”
Dry on the surface doesn’t always mean dry inside. Wood can hold moisture after cleaning, rain, or humidity spikes. When stain goes on too soon, it can:
- trap moisture in the board
- reduce penetration
- lead to early fading or patchiness
“I’ll stain over the gray.”
If the wood has turned gray from sun exposure and weathering, that gray is often a sign the surface has been altered. Stain can still work, but without proper prep you’ll get inconsistent absorption and a lighter, uneven tone.
“I’ll do one coat and call it done.”
Some stains are designed to build color with multiple coats; others are one-and-done. The “secret” is matching the product instructions to your fence condition—not guessing. When homeowners apply too thinly, the color never reaches the depth they were expecting, and UV protection can be less effective.
Common Mistakes That Reduce Fence Lifespan
Here are the issues we most commonly see—especially on wood fences that start looking rough too quickly.
1) Skipping or rushing surface preparation
The fastest way to waste money is to stain dirt, mildew, or old residue. That’s why you’ll see blotches and early wear spots near wind-blown grime lines and sprinkler zones.
2) Staining on a schedule instead of a condition
A fence can be “supposed” to be stained in spring, but if it’s still damp from recent weather patterns, the coating won’t perform. In North Texas, timing needs to be based on readiness, not just calendar dates.
3) Ignoring how the fence was installed
We sometimes get called after staining because the fence started leaning or separating. While staining affects appearance, it can’t fix structural movement. If your posts were set too shallow or drainage around the base wasn’t considered, the fence will shift, and your stain will wear unevenly where boards rub or flex.
4) Applying stain in direct sun heat
When boards dry too fast, you can get lap marks and inconsistent penetration. Working in shorter sections and choosing a favorable weather window helps keep the finish uniform.
Fence Maintenance Checklist (Before and After Staining)
Use this planning checklist to protect that rich color and keep the fence from “aging out” early.
Before staining
- [ ] Inspect for loose boards, protruding nails/screws, and damaged pickets
- [ ] Check for mildew or surface graying that needs cleaning
- [ ] Confirm the wood is fully dry after cleaning
- [ ] Protect areas near sprinklers and downspouts from overspray
- [ ] Test stain on a small section to confirm absorption and color tone
After staining
- [ ] Keep sprinklers off the fence for at least 24–48 hours (follow product instructions)
- [ ] Watch for early issues after the first rain—runoff patterns can reveal missed coverage
- [ ] Recheck hardware and rail connections (staining doesn’t stop movement)
- [ ] Plan light touch-ups instead of waiting for full fading
Signs Your Fence Needs Repair (Not Just Re-staining)
Re-staining can make an old fence look better—but if the structure is failing, the appearance won’t last. Look for:
- boards that are sagging or pulling away from rails
- gaps that are widening near post lines
- posts that wobble when pushed by hand
- areas where stain is peeling or flaking (often due to moisture issues)
- fast color fade concentrated in one direction (usually water flow or sun exposure patterns)
If you see those symptoms, address the underlying problem first. Otherwise, you’ll be putting new color on a moving surface.
Plano / North Texas Relevance: Why Color Fades Differently Here
In the Plano area, wood fences don’t just experience “sun and rain.” They see:
- intense summer UV exposure that accelerates surface weathering
- rapid wet-dry cycles that stress the wood fibers
- wind-driven debris that can keep certain sections grimy
- irrigation patterns that unknowingly target fence bottoms and edges
We also see plenty of fence systems installed with inconsistent drainage planning—especially when properties have shifting soil or downspout runoff that ends up at fence lines. Even a great stain can look uneven if water is pooling at the base and repeatedly saturating the lower boards.
A Real-World Case Example: Fixing Blotchiness on a Weathered Privacy Fence
A homeowner in a Plano neighborhood contacted us after they applied stain and hated the results. The boards had a blotchy look, with lighter areas that made the fence appear patchy instead of rich.
When we inspected, the root cause wasn’t the color choice—it was the prep. The fence had mildew and surface residue that weren’t fully removed, and some sections had dried unevenly after cleaning. The stain absorbed differently across the fence line, so the final tone didn’t match what they expected.
Our solution was practical:
1. Thorough cleaning and brushing to remove remaining residue
2. Allowing full drying time before re-applying
3. Using a technique that promotes even penetration (consistent coverage and back-brushing)
After the redo, the color depth evened out across boards, and the fence looked dramatically more uniform.
If you’re considering staining and want the color to look “intentional” instead of accidental, proper prep and application technique are the difference.
When Staining Isn’t the Best Move: Consider Material Strategy
Staining is a great option for wood fences, but it’s not the only path to long-term curb appeal. If you’re tired of repeated maintenance—or you need a system built for maximum durability—some homeowners decide to transition to other materials or mixed setups.
For example, if you’re comparing options across fence types, you may be weighing commercial fencing solutions for a business perimeter or mixing materials for style and stability. Many properties choose combinations like wood privacy sections paired with more durable boundary elements where water exposure is worst.
If you’re also dealing with gate wear, don’t ignore the hardware side—gate swing points and latch alignment can affect how coatings age at stress points.
Quick Comparison: What to Expect From Common Fence Materials
| Material | Typical Appearance | Color Options | Maintenance Reality |
|---|---|---|---|
| Wood fences | Warm, natural grain | Stains/paints | Prep + periodic upkeep |
| Wrought iron fences | Classic, crisp lines | Powder coating / paint | Rust checks + touch-ups |
| Aluminum fences | Clean, modern look | Powder coating | Low maintenance, minimal corrosion risk |
| Vinyl fences | Consistent color | Color through material | Occasional cleaning |
| Chain link fences | Functional perimeter | Usually coated | Keep posts secure; rust prevention if applicable |
| Mixed material fences | Custom “best of both” | Multiple finishes | Plan upkeep by material |
If your goal is rich color with minimal maintenance, it’s worth discussing whether a stain refresh makes sense—or if a material upgrade is the better long-term move. You can also explore farm fencing options when you’re working with larger properties and different exposure conditions.
Recommended Next Step for Better Results
If your wood fence is already weathered, the best “staining secret” is treating prep like part of the finish—not a chore. We can also help identify whether you need repairs first, because a fence that’s structurally moving will always look less consistent after staining.
And if your project includes gates, don’t forget that gate surfaces often require different attention due to contact points, hardware, and swing stress.
If you’re planning an upgrade or you want to keep your fence looking rich longer, we can help with the full system approach—from staining to hardware and gate performance. For guidance on the coating side, you can review our staining contractor services and get a plan tailored to your fence condition.
FAQ
How soon can I stain after cleaning my wood fence?
In North Texas, you’ll want the wood to be fully dry—not just dry to the touch. After cleaning, allow enough time for the boards to lose moisture completely, and avoid staining if rain or heavy humidity is likely soon. If you stain too early, you can trap moisture and end up with uneven absorption, lighter patches, or faster fading. For best results, follow the stain manufacturer’s moisture guidance and plan around weather windows.
What’s the biggest reason stained fences fade early?
Most early fading issues trace back to surface prep and moisture control. If mildew, residue, or old buildup remains, the stain can’t penetrate evenly or bond properly. Another common cause is water exposure—sprinklers or runoff repeatedly wet the same sections, breaking down the finish faster. Fixing those water patterns often improves color retention dramatically.
Should I repair my fence before staining?
Yes. Staining won’t correct movement or structural failure. If boards are loose, posts are wobbling, or rails are misaligned, your stain will wear unevenly where the fence shifts. Address structural repairs first, then stain so the finish stays consistent across the entire fence line.
Is stain or paint better for long-lasting color in Texas?
It depends on your wood condition and the product system. Penetrating stains are often favored for natural grain and good color depth, while paints can provide a more opaque look but require careful prep for adhesion. The key is matching the coating type to the fence’s current condition and ensuring proper cleaning and dry timing.
Ready to Improve Your Property’s Security and Appearance?
Rich, long-lasting fence color isn’t luck—it’s preparation, timing, and technique. If your wood fence is starting to fade, look blotchy, or show early wear, addressing the underlying condition first is what makes the difference between a quick cosmetic refresh and a finish that holds up through Texas weather.
About Fence Pros of Texas
Fence Pros of Texas provides residential fencing, commercial fencing, automatic gates, access control systems, railings, staining, and custom fence installations throughout Plano, TX and surrounding North Texas communities. We focus on durable craftsmanship, long-term property security, curb appeal, and helping homeowners and businesses improve privacy and protection through professional fencing and gate solutions.